Friday 30 October 2015

Pizza Samosa Recipe

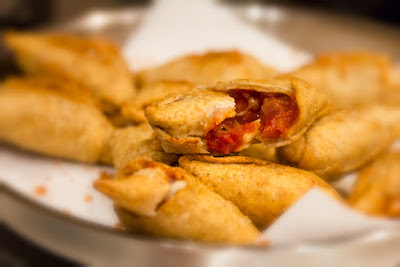
With Diwali around the corner and Christmas fast approaching the festive spirit is truly in the air. Nights have become longer and darker and the days are progressively getting colder and colder. As I wrap up in more and more winter layers the need to eat sensibly seems to be escaping me - it's easy to swap cold summer smoothies and salads for warming soups and spicy stir frys but there is something about winter that just calls for something more celebratory and definitely more indulgent. In order to regulate my need for over the top winter warming comfort food I have come up with a plan to try and remain sensible for as much of the week as possible, and then end with the most indulgent, festive, fun, warming treat I can come up with - enter the pizza samosa. I'm sure there will be other deviant foods in the pipeline but this week, when I'm truly feeling the onset of winter for the first time this year, it has to be this combination of two of my favourite 'cheat' foods.

indian recipe
Freshly fried samosas bursting with delicious pizza filling.


I love my Mum's homemade crispy, delicate samosa pastry but these pizza samosas call for something with a bit more bite to make you feel like you're sinking your teeth into a deep dish pizza filled with saucy marinara and mozzarella. As a result the pastry I have put together is quite firm and requires a good amount of elbow grease to roll perfectly. Personally, I find the best way to do it is to portion the dough (16 pieces works for me but you can make your samosas bigger or smaller if you wish), roll into fairly smooth balls, flatten slightly with a rolling pin and then pass each ball of dough through a pasta roller up until it reaches grade 3. If you don't have a pasta roller or if you just prefer the good old fashioned rolling pin that's absolutely fine -  it will only make these indulgent samosas even more worth it!

samosa stuffing
Reduce the sauce until thick but not completely dry.


The filling outlined here is definitely Indian inspired - it's what works for my family and I but you can change it up to pretty much anything you like, just use the quantities as a guideline and be as creative as you like.

Ingredients:
For the dough:
300 g chapatti flour (use plain flour if you don't have chapatti flour)
1/2 tsp salt
40 g cold ghee/butter
10 tbsp cold water
1/2 tsp sunflower oil

For the filling:
2 medium red onions
1 tbsp sunflower oil
4 tsp crushed garlic
2 hot red chillies, finely chopped
1 tsp Italian mixed herbs
100 g mixed peppers, diced
1 x 400 g tin plum tomatoes
2 large tomatoes, diced
salt and black pepper to taste
125 g mozzarella torn into small pieces
Oil for frying

Method:
  • Start by making the dough - weigh the flour into a large mixing bowl and sprinkle in the salt.
  • Add the ghee/butter in small chunks and use the tips of your fingers to rub it into the flour until the mixture looks sandy.
  • Make a well in the centre of the flour mixture and add about half of the cold water.
  • Mix together adding more water 1 tablespoon at a time as required until the mixture comes together as a fairly smooth but firm dough.
  • Knead the dough for 7 minutes, you will notice that it becomes smoother and slightly more elastic the longer you knead. When the 7 minutes are up the dough should come together a smooth dough.
  • Drizzle the oil over the dough and rub it just lightly over the surface.
  • Cover the dough with a slightly damp tea towel and leave aside to rest for at least one hour (ensure the tea towel isn't too wet otherwise the dough will absorb the liquid and become soggy).
  • To make the filling start by roughly dicing the onions - we like a bit of bite so they don't need to be too fine but if you want a smoother sauce just go a bit smaller.
  • heat up the oil in a wide, heavy based pan and when it becomes hot, add the onions.
  • Stir fry the onions until they just begin to brown before adding the garlic, chillies, and herbs.
  • Allow the spices to saute and release their flavours into the oil for a few moments before stirring in the peppers.
  • Stir fry until the peppers are vibrant and crisp, then pour in the contents of the tin of tomatoes - don't liquidise this just add it as it is.
  • Mix everything together well and add the diced tomatoes.
  • As the sauce begins to heat through you will find that it is quite easy to roughly break up the plum tomatoes from the tin using the edge of your spoon, go ahead and break them up as much as you like.
  • Season the sauce with salt and pepper and leave it to reduce until it becomes really nice and thick - remember if the sauce is too runny it will make filling and folding the samosas quite messy so you want the mixture to become really concentrated but not completely dried out either.
  • When the sauce is the right consistency leave it aside to cool completely.
  • To assemble the samosas, portion the dough and roll out the pastry until it is about 3 mm thick, I find grade 3 on a pasta roller is perfect. If you are using a pasta roller you will achieve long strips of pastry anyway but if you are rolling by hand - use two portions of dough at a time, combine into a ball and roll into a circle. Cut the circle in half and use each semi circle as one strip.
  • Lay a strip of pastry horizontally in front of you and moisten along the bottom edge with a little water.
  • Roll the pastry into an open cone using the moistened edge to stick the pastry together and create a point at the bottom of the cone.
  • Turn the cone around so that the open mouth faces you.
  • Add a little mozzarella to the cone first and then fill upwards layering sauce and mozzarella until the cone is three quarters full.
  • Moisten the top edges of the pastry and fold them down to close the samosa - ensure the samosa is fully sealed so that it doesn't leak when frying.
  • Once you have wrapped all of your samosas fry them in moderately hot oil to ensure the pastry is cooked through and the cheese inside is beautifully melted.
  • If you wish you can sprinkle some salt, chilli powder and chaat masala onto the fried samosas whilst they are still hot to provide an extra burst of flavour and texture.
  • Serve warm, preferably with a cup of masala chai :)

Thursday 27 August 2015

Indian Inspired Protein Truffles (Vegan)

This week's recipe is especially for all you sisters out there who this Raksha Bandhan have to cater to gym obsessed brothers - I feel your pain ladies. My own brother is currently on a training regime that allows no dessert or sweets as part of the process and at the same time he is always looking for a protein fix. While it's all for a good cause (he will be taking part in a mini triathalon to raise money for a brand new state of the art cancer treatment center at Guy's Hospital, London) it can get a teensy bit frustrating for the rest of us when it comes to birthdays, celebrations, and now Raksha Bandhan.

Luckily, making 'healthy' desserts is no new concept - people have been trying to think for better ways to sneak a little treat into their healthy lifestyles for years and the recipe I have today combines my Mum's traditional recipe for 'khajoor' or date roulade with the much newer trend of 'protein balls', of course with an entirely optional coating of dark chocolate.

These protein truffles are filled with dates, chia seeds, flax seeds, hemp seeds, almonds, pistachios, coconut, and cacao so each one packs a punch of goodness. They are also gluten and dairy free, and can be eaten as part of a vegan or raw food diet. If you don't have any of the nuts or seeds to hand just substitute with a little extra of what you do have - the ingredients are really flexible.

healthy_dessert


Ingredients:
200 g dates
3 tbsp grated or desiccated coconut
3 tbsp ground almonds
2 tbsp chopped/ground pistachios
2 tbsp ground flax seeds
2 tbsp chia seeds
2 tbsp hemp seeds
1 tbsp cacao powder (can use cocoa instead)
1/2 tsp cardamom
100 g good quality dark chocolate, at least 70% cocoa solids

Method:
  •  Peel and pit the dates before adding them into a food processor.
  • Add all of the remaining ingredients apart from the dark chocolate and pulse to combine everything really well. You should end up with a kind of sticky dough. Your dough might be more or less sticky depending on your ingredients but if it feels too wet add some more coconut or ground almonds, and if it feels to dry add another date or two.
  • Tip the dough into a mixing bowl and knead lightly just to make sure everything has come together really well.
  • Take a tablespoon of the mixture in your hands and roll into a smooth ball - I find rolling the ball in a tablespoon sized rounded measure helps get the shape really smooth, and place on a tray or plate lined with greasproof paper.
  • Repeat with the remaining mixture, you should get around 16 - 20 balls.
  • If you wish to leave it here and not dip the truffles in chocolate just place them in the fridge to firm up and then transfer to an airtight container and keep refrigerated until required.
  • Otherwise place the tray in a freezer and allow the truffles to firm up for 30 mins - 1hr.
  • Once the truffles are nice and firm gently melt the dark chocolate either in a bain marie or in a microwave, whichever you prefer.
  • Use a fork to help you carefully dip each truffle into the melted chocolate, ensuring it is fully coated remove and transfer back to the lined tray.
  • The chocolate should start to set quite quickly as the truffles are cold from the freezer.
  • If you wish, once the chocolate has almost set but before it dries completely, roll the truffles in cacao/cocoa, ground pistachios, coconut or almonds for a decorative effect and added texture. Or you can leave them plain, either way once they have fully set at room temperature transfer them to an airtight container and keep refrigerated until required.
  • Wishing you a happy and healthy Raksha Bandhan! :)

Thursday 13 August 2015

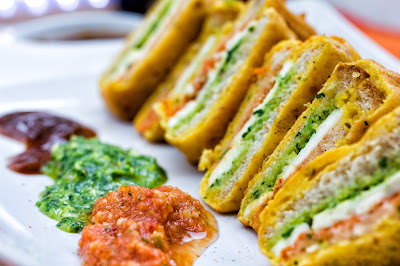
Indian Independence Day Tiranga Sandwich Pakoras

On August 15th 1947 India officially became independent of the British empire, the 'tiranga' (triple coloured) official flag of India was hoisted for the first time, and ever since that day the anniversary of India's independence has been celebrated with all the vibrance and gusto associated with Indian festivals. The day itself is a national holiday and marked with kite flying, patriotic singing and dancing, a gun salute, important speeches by the Prime Minister, parades, gatherings, and of course feasts. Most central to the festivities though is the flag - symbolic not only of patriotism but everything else that it's design stands for. The colours and the wheel in the middle represent different things to different people - some will say that the colours all together on one flag show the inclusiveness of the different faiths celebrated and respected within India, to others the colours stand for courage, peace, and faith. The wheel was originally a spinning wheel representing self reliance, but now is a chakra symbolising the circle of life, dharma, or karma.

Tiranga_Pakoras


The official description given for the flag was provided by Sarvepalli Radhakrishnan, the second Prime Minister of India, who said: "Bhagwa or the saffron colour denotes renunciation or disinterestedness. Our leaders must be indifferent to material gains and dedicate themselves to their work. The white in the centre is light, the path of truth to guide our conduct. The green shows our relation to the soil, our relation to the plant life here, on which all other life depends. The "Ashoka Chakra" in the centre of the white is the wheel of the law of dharma. Truth or satya, dharma or virtue ought to be the controlling principle of those who work under this flag. Again, the wheel denotes motion. There is death in stagnation. There is life in movement. India should no more resist change, it must move and go forward. The wheel represents the dynamism of a peaceful change."

The symbolism of the flag is so important that people go to great lengths to include it as part of their celebrations - most commonly by making their favourite recipes in orange, white, and green especially for the day's feast. My favourite, ridiculously simple but extra celebratory, recipe to honour Indian independence day is this one for Sandwich Pakoras, taken from my Indian Afternoon Tea recipe ebook. The colours are vibrant, the flavours are wonderful and best of all, it's quick and easy to prepare! :)

Bread_Pakoras


Ingredients

For the Filling
6 slices of bread
A block of paneer, sliced
Tomato and garlic chutney
Spicy coriander and mint chutney

For the Batter
150 g gram flour
1 tsp salt
½ tsp red chilli powder
1 tbsp yoghurt
100 ml water
Large pinch of finely chopped fresh coriander leaves
Sunflower oil for deep-frying
Chaat masala and date and tamarind chutney to serve

Method

  • Start by laying three slices of bread down in front of you and spreading each with a spoon or two of tomato and garlic chutney.
  • Layer the paneer on top of the chutney – be as generous as you like.
  • Spread the coriander chutney on the remaining three slices of bread and press these on top of the paneer, chutney side down.
  • Carefully cut each sandwich into quarters and leave aside while you prepare the batter.
  • Mix the gram flour, salt, chilli powder, yoghurt, water, and coriander leaves together in a mixing bowl until smooth and with the consistency of thick cream.
  • Heat up oil for deep frying in a pan placed over a medium-high setting.
  • When the oil is suitably hot (drop in a breadcrumb and if it rises instantly you are good to go), slightly press down one of the sandwich triangles and dip it into the batter – be quick or the bread will turn soggy, but be thorough and ensure the sandwich is fully coated.
  • Carefully place the sandwich into the hot oil and fry until golden on all sides. Fry as many sandwiches at a time as you feel comfortable with, or as many as will fit in your pan.
  • Drain and transfer onto kitchen paper towels, sprinkle generously with chaat masala while the sandwich is still piping hot – this will ensure the masala sticks to the sandwich.
  • Repeat until all of the sandwiches are fried, you can then cut each triangle in half again if you like so that the alternating colours on the inside are displayed.
  • Serve hot with date and tamarind chutney.
For the full Indian Afternoon Tea Ebook please visit: http://devnaa.com/collections/recipe-books